Welcome to NEFF

Sign up for a new account today, or log on with your old account!

Give us a try!

Welcome back to the new NEFF. Take a break from Twitter and Facebook. You don't go to Dicks for your fly fishing gear, you go to your local fly fishing store. Enjoy!

Planning to Redo a Bamboo fly rod I purchsed off of ebay

tomfly

The only thing left should be foot prints.
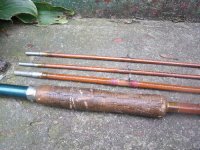
After being out bid on many Bamboo rods on ebay. I was finaly triumphant and recieved the rod today. I was working on $50.00 budget. You may ask; why so cheep? This is the first Rod that I am attempting to do. So if I destroy the rod although disappointing it would be. It would not hurt so much economicly. I have full undersatanding of the daunting task that I am about to partake in. The rod I bought is a Shakespeare Bamboo Fly Rod model A1305B-9'. Not an overwhelming sought after fly rod. But I think it will be a fun first project.

I am setting up this blog so my freinds NEFF can share in the chronological redo or destruction of this rod. I want to share my achevements and my failures in the learning process. I am starting out with absolutely no tools to do this with. But I will address it when they are needed. I am letting you all know now I am not doing a restoration project. I have my owne vision for the rod. Weather I can obtain my goal still has yet to be determined. Any feed back or constructive criticism durring the process would be appreacheated. I am attaching some pictures as the rod as it looked on ebay.
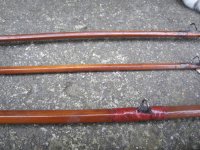
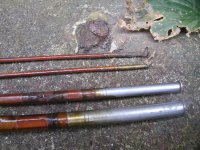
rod2.jpg


rod1_12.jpg

rod3.jpg
 
Rod repair Day 1 10-2-11

Rod Assessment:

I had a chance to review the overall condition ot the rod today.
The rod was filthy. I cleaned it with a brush and mild detergent. From the appearance and the ammount of gunk in the guides, I do not believe that the rod has been fished with in long time. I had to put a real on it and try it . I was supprised how well and accurate it casts a six weight line. I was able to cast the whole line without much effort.

The rod has three diffrent type of wraps on it. It has the orignal gold, it appears to have some fragility issues probably dry rot. This would explaine the atroshishy done red and black wraps on the guides.

The finish on the rod is chipped and pitted. The finish needs to be striped and re-dipped. I have concern on what cource to take stripping of the bamboo. From what I read there are two schools on this procudure. Using a stripping agent or scraping it with a razor blade. I need to make a discissionon how I am going to attack this problem. (any suggestions would be helpful)

The bamboo is in relatively good condition, there are no splits, cracks or diviots. The butt section is straight. The mid section has a slight bow in it . One tip has a slight S curve in it. The second tip has a slight bow in it . I should know more after the guides are removed and I can roll them on a flat surface. Overall I am confident I can bring them back to straight and true.

The cork handle has some issues. There is a section with a thumb size piece missing. There are some smaller gouges in it also. It will need to be repaced. The real seat has some ware, but it held the real just fine. Because I am going to replace the grip, I will change the real seat also, There no cracks in the ferrules but I want to upgrade them from aluminum to nickel.
 
Last edited:
Tomfly,
I use Citristrip gel and have done a number off old rods with it.
Follow the directions and the old varnish will wipe right off.
follow with their stripper after wash and the rod will be clean.
I have not had any glue issue arrive from using the stripping solution.
The razor technec is a little more dangerous and you could wind up damage
especial on the corners of the rod. I then sand with a 400 grit sand paper and final buff with 0000 steel wool.
I put two coats of a wipe on Tung oil finish buff out with a soft cloth and the rod is ready to wrap
Hope this helps
Ron
 
Day 2 10-4 -11
I spent a few hours on the rod last night. I took detailed measurements of the rod that included the center point of all the guides. I removed the reel seat. It was very simple, as it was held on with a small screw. There is a small piece of wood glued to the rod that was under the reel seat. I will see if I need to remove that after I receive the new seat. I cut away the old cork grip. I was worried about scoring the rod. The way I went about this is to cut halfway through the cork and chip it with a small screw driver. The cork came off very easy. The epoxy that held it on was a different story. I slowly cut it away with a razor knife. I have it close to the bamboo, if the stripping agent does not remove the rest. I do not believe it will impede the new grip. I started removing the wrap. This can be tedious. I was incorrect in my initial assement there is no red thread on the rod. It is red nail polish. Not fun to remove. I will probably do some more tonight. I will post some pictures after I complete this.
 
Last edited:
Day 3 10-5-11

I finished removing the old wrap off the rod this evening. I found an easier way to accomplish this. I used an X-Acto knife to grab a single thread. I could unwind the wrapping without cutting the thread off. A much more efficient way. I went to the store to pick up some hardware for the construction of a rod wrapper. I will probably start building it this weekend. Planning on stripping off the finish tomorrow evening.
 
Last edited:
Haven’t posted to my blog for a while There were some site problems and I went on vacation with my wife. I have made some progress though.

10-6-11
I stripped the old finish of the rod last week. I took Ronbo’s suggestion and used Citristrip. I had to apply it twice in 30 minuet intervals. It worked great thanks Ron. I used a small putty knife to remove the stripping agent and old varnish. I cleaned the rod with odorless mineral spirits. I had to do this numerous times. A brown film kept coming off the rod. After 8 to 10 times of wiping, I could wipe the rod and the rag would be clean.
I was able to polish the ferrules with Bar Keepers Friend.( I did this before I removed the finish, I did not want to get any polishing compound on the raw bamboo.) They shined up very nicely. I wasn’t sure how they were going to come out but they look great. The person who built the rod originally dresses the ferrules beautifully, they are very nicely tapered into the rod, probably why they haven’t cracked or checked. I have decided not to replace them.
I do not have a heat gun to straighten the sections with. I am going to try a hair dryer that I stole from my wife. I will let you all know if it works. After I get it straight I can start the finishing process.

ROD6.jpg picture by tomfly1 - Photobucket

Rod4-1.jpg picture by tomfly1 - Photobucket

rod3.jpg picture by tomfly1 - Photobucket


10-7-11
I received my rod grip yesterday. A piece of Gabon Ebony It is not much to look at now. After I turn it should be nice. I am going to attempt to build a home made wood lathe. I have most of what I need laying around the basement, attic and shed. I haven’t turned a piece of wood since eight grade wood shop. I will have to practice a bit before I attempt to cut the Ebony. Will start building my rod wrapper today, I have drawn up some plans so it should not take to much time.


Rod5.jpg picture by tomfly1 - Photobucket

10-14-11
I have made some progress on my thread wrapper it is almost finished. Have most of the components together for the construction of the wood lathe. The hardest part was obtaining a working electric motor. I removed an old AC fan motor it burned up while testing it. I had to revert to plan B. I scavenged a motor out of an old shop vac. It works great. It spins a little to fast. I will reduce the RPM with pulleys and a belt.
 
Last edited:
10- 18-11

I have made some more progress. I have put the third coat of Tung Oil (another one of Ronbo’s suggestions) on the rod this morning. It is starting to have a nice shine to it. I have most of the wood lathe complete. Work on a good chunk of it last night. It is amazing what you can build with some plywood, an old steal bed frame, shop-vac motor and the track from my old shower door assembly. I have ordered my Buttcap, Slide ring and the winding check (I hope measured it right.) Hopefully by the weekend I can start to practice turning a handle. I still need to order guides and thread. I have not decided on what I want to use at this point. I got to hand it to you guys who build rods. I am just redoing a rod and it is a lot of tedious work.
 
October-25-2011

It has been a hectic week at my home. Had windows replaced. Then had the interior painted. I still made some process on the rod. On my 9th coat of Tung oil I sanded with 600 grit after the 3rd and 6th coats. I then realized that I can achieve the desired finish if I wipe on the Tung oil and immediately wipe it off. I believe the first few coats I wiped on were too heavy it gave the rod an uneven finish. Now the rod is maintaining a very smooth finish. I have been working evenings on the build of the wood lathe inspite of all the activity in my house. I have the drive assembly fully working. I have assembled the tool rest. The only assembly that remains is the tail stock. I should be turning some practice handles by the end of the week. I decided to keep putting coats of Tung oil on the rod until the handle is turned.
 
10-28-11
Finished construction of the lathe last evening, started to practice turning. I suck at it. Need a lot of practice. I am happy with the way the lathe operates. But it scares the crap out of me. I do not trust it yet (I guess I have home made lathe syndrome) I am surprised it works at all. It is the first time I have ever done anything like this. Just made from some stuff I had lying around and some hardware (Nuts bolts threaded rod). Total cost was about $25. The biggest challenge that I encountered is drilling a 10 1/2" whole straight through the center of the stock. Not an easy task. I ordered all the components need to continue with the rod build. ( guides, thread, .) This better come out the way I want it too. I gave up all my Fall fishing for this rod.
 
Last edited:
11-1-11

I am having some trouble with drilling a whole 10 1/2” long. Drilling the whole is not the problem. The issue I am having is Drilling a perfectly straight hole that is 10 1/2” long. I tried it free hand nada… I tried in a Drill press nada….. I do not think it can be done. From what I have been reading Wood is one of the hardest substances to drill accurately. The trouble is that wood does not have a consistent density, so the drill bit follows the laws of physics and takes the path of least resistance hence creating a crooked whole. I came up with a new solution. What I have decided to do is drill 4-5 inch whole in the handle and cut the Rod.
 
11-3-11
Success at last; I turned my first test handle this evening that did not come out looking like a piece of crap. I am mildly pleased.
after 3 horrific failed test handles. I think I am getting it down. This is the design that I came up with. What is holding me back now I do not have the Slide Ring and Pocketed but cap, I ordered it 2 weeks ago and I still do not have it. I can not proceed with out knowing what diameter of the reel seat but I am confident I can turn the handle with success..

handle2.jpg picture by tomfly1 - Photobucket
 
Last edited:
11-8-11

I received all my guides for the rod on Saturday. I royal F*** that up! Every guide that I ordered including the stripper guide is 1 size to large. The two tips were correct. I will have to some reordering. I started turning the ebony last evening (what did I get myself into) It took about an hour to find the center of both ends and drill the holes in each end. It took another hour to knock off the square corners with a plane. Then I was able to start turning it. It took an hour and a half to remove a quarter of an inch off the stock. It is like turning a piece of granite. And this is the best part the motor on the lathe went poof in a puff of smoke (what the f####). I had to think, I did not want to rebuild the drive assembly. What I came up with; is I remove the shaft that turns within the armature assembly and the bearing assembly from the motor. I mounted a router to the back of the drive mount on the lathe. I mounted the bearing assembly to the front of the drive mount on the lathe. The old motor shaft is attached between the router and the bearing assembly. It works well. I dodged a bullet. I will try to continue turning tomorrow evening.
 
Last edited:
11-13-11

I worked on the handle a bit. It is still not finished. I am going about it slow. I have been reading up on cutting ebony. There is a slight problem with the wood. It is prone to cracking. What causes the problem is heat. So I am doing it in gradual increments. I can not work the wood more then 5 minuets at a time and then 20 minuets to cool. Hope to have it finished by next week end.
 
11-15-11

I was worried about the heat on the Ebony. My concerns were justified. The reel seat cracked last night while sanding. I heard a pop. I did not have to look I knew exactly what had happened, $30.00 down the tube. I ordered a new piece today. I hope my luck changes. The next one I will not sand on the lathe. I will take my time and sand it by hand.
 
11-21-11

I had a greatest time at the INFTS on Saturday. Some of the stuff I was no impressed with. These plastic body realistic flies do not impress me. (I like fur and feathers) And there was stuff that blew me away truly artistic. Some of the salmon flies and streamers WOW they are unbelievable. I was impressed with a technique of extending bodies on Dries using a feather rather then a using a piece of Mono. (Mark Wayne) See you can teach an old dog new tricks. I was fortunate to be able to spend time talking with Bob Clouser. He forgot more about fly fishing then I know. He is a nice guy.

Re did the lathe on Sunday I installed a lower RPM motor I got for free works way better. No belts and pulleys now it is direct drive @ 3400 RPM. The slower RPM should help with the heat problem.
I worked on the new piece of ebony this evening. It took about an hour to center the stock. And I turned it for another hour. I took it down from a 1 7/8 to about a 1 1/4;. I also laid out the reel seat and the tapers in the handle. It should be done by Friday.
 
Last edited:
12-7-11

I haven’t posted in a while but I have still been working on the rod.

I finished the turning the handle last week. I am very pleased with the outcome. I sanded in increments 50, 80, 120 150, 220 and 600 grit sand papers and 000 steel wool. The next hurdle I had to climb was drilling the whole for the rod. I was not sure how to attempt it. The problem was the handle is round and tapered. I read on line do not drill it in the lathe. It leads to cracking. The first one cracked while sanding. Do not want to turn another one. I had to think on how I was going to attempt it. I brainstormed for a few days. The problem I was facing; how do I make it plumb and level for drilling. I had a eureka moment while watching the Giant Green Bay Game. (The Giants almost pulled that one out.) This is what came up with.

Last evening, I un-mounted my vice from my work bench. I placed a board on the bench extending the board 2 feet past the end of bench. I put the vice on top of the board and clamped the board and the vice to the bench. I placed a level on the board. Leveled it, and cut a leg for the end of the board to prop it up. I rapped the rod handle with nylon cord and duck tape to protect it from the vice jaws. I place the handle in the vice with the reel seat facing down and touching the board. I scribed the reel seat on the board. I then drilled a hole in the board the same diameter as the reel seat. I placed the handle back into the vice allowing the reel seat to set into the whole in the board. I used a hammer to tap the board in and out to plumb the handle front to back. I moved the handle right and left in the vice jaws to plumb the handle side to side. It worked I was able to maintain the handle true and plumb in the vice. This technique aloud me to drill a 6 inch whole straight in the handle. I then placed the handle into the rod to measure how much I had to cut off the end of the rod, it came to 3 inches. I then tested the handle in the rod. It fits very snug and the rod sits perfectly straight. I am happy that the handle is finely complete.

When I got home this evening I wet sanded the handle with 1200 grit paper. Instead of using water I used tung oil to wet sand. I read that doing it this way will fill any tiny pores in the ebony. I let it set for 5 minuets and wiped off the excess. A few more coats and the finish work will be done. I can finally start wrapping the rod with thread. I will probably practice on an old mini blind handle first, it is a hex shape.
 
Thanks Pete. Neve thought about Gun Drill Bits. I will keep it in mind if I make a grip again.I probably will in the future, I have a few more ideas I would like to try on my next project.
 
Last edited:
12-9-11
I added 2 more coats of tung oil to the grip. I am getting pissed every little piece of dust and fuzz wants to stick to it. I ordered a rod dryer of eBay today for $24.00. It should work well. It only spins at 9RPM. I do not think I could have purchased the parts and built one cheaper. I was going to try to find an old microwave and use the turntable motor. For 24 bucks I will be a head of the game. I will probably start practicing wrapping this weekend. I will probably F@@@ up a lot have never wrapped a rod before. I have not even tested my wrapper yet. I am confident it will perform.

I am going to try to attempt a wrap job that I do not think has been tried before. I have 2 thread colors
YLI Silk Sparkle 202-OM-S38 Dark Grey/Silver and YLI 100 wt silk thread Black
What I am going to attempt is to alternate the color so each segment on the hex is different. I have an idea on how I am going to accomplish this but won’t know until I try it. I don’t know how it will even look. It may come out looking goofy and I defiantly do not want that. If it comes out like I think it should. It will certainly be unique.
 
Last edited:
12-14-11

Wrapping thread on a rod is more difficult then it appears. I read some articles and watched more then a few videos on YouTube. I thought it looked some what straight forward. I should have known videos can be deceiving. I found that if the tension is not set just right. If the angle of the thread in relation to the point of contact of the rod is not correct, the wrap will not track right. I was getting mildly frustrated. I am having trouble starting the thread Yea wrap it over it’s self. That is easer said then done. I know it is an easy concept but try to keep the thread straight and on the point of the rod that you want to start it. Not easy. On top of it my eyes suck so I have to wrap through my fly tying magnifier which I hate to use even while tying flies.

My wrapper that I built seems to work properly. I think my problems are due to lack of experience rather the operational functionality of the wrapper. The one problem that I did observe is that the tensioner does not stay set. The problem is I decided to go with a post and spring design for thread tensioning system ( carrage bolt attached to the base of the wrapper, Washer, thread spool, washer, spring, washer , wingnut. What is happening is when the spool turns, everything turns with it including the wingnut, I found this out when the thread broke. I should be able to solve this issue vary easily. About as my less then pristine wrapping abilities the jury is still out on that.
 
Last edited:
12-14-11 Amended


I was wrong it was not my inept wrapping abilities. I fixed the tensioning issue and the wrapping became much easier. I also learned that a popsicle stick is a good tool for keeping the thread tight. I was able complete a ferrule. I am happy with the way it came out. Will do more tomorrow evening.


IMG_1774.jpg picture by tomfly1 - Photobucket
 
Last edited:
12-19-11

Wrapping is not all it cut up to be. For me it has been a comedy of errors. I am sure that the rod builders on the site would love to be a fly on the wall watching this debacle. The thread breaks. I hit the thread with the razor. I forget to cut the thread starter tail. I put the pull loop in the wrong way. I finish a wrap and admire my work and 2 seconds later it unravels. I wish I had stock in the thread company. With each mistake I learn a little more. It is very time intensive. I know when I start to get frustrated; I need to walk away from it. This an art form that I have a long way to go before I am even an amateur.
 
12-23-11
Merry Christmas to all my friends and their families on NEFF.

I believe that I have resolved the issue of dust and fuzz sticking to the wet Tung oil on the grip. After weeks of attempting to get a clean finish I have came up with a solution. The first thing I need to accomplish is a dust free environment. I took an empty 5 gallon joint compound bucket and cleaned the bucket thoroughly. I cut a 3 inch diameter hole in the lid of the bucket and tack clothed the entire inside of the bucket. I cut a dowel to span the hole. I decided to forgo wiping on the Tung oil. I Made a dip tube out of a paper towel cardboard tube. I duct taped one end shut, filled the tube with the Tung oil I dipped the grip in the tube and hung it inside the bucket. I did 3 dips allowing the grip to dry 24 hours between dips. It is starting to look good. I am now going to wait 48 to 72 hours. I will begin to wet sand with 1000 and 1200 grit paper and a finally with rubbing compound and Butchers wax. Hopefully this will give that nice Black luster of a Baby Grand Piano, I have my fingers crossed.

I would also like to thank Ronbo for critiquing my wraps that I have done so far on the Rod. Ron has been a big help throughout this project. I do have the mid-section complete. One tip is fairly complete. The last guide on the top of the tip is so small and the tip so narrow you need a child’s hands to do it. Just getting the guide taped to the rod in the right location was a challenging task. I still have a second tip top complete. It is probably going to be more difficult then the first because I have to mirror the wraps.

I have not decided what I am going to do for the rod case as of yet. I do know this, I do not want a Tube and Sock. I believe that a Bamboo Rod is too elegant and classic to drop in a tube. I think I am going to build a case out of wood. I am not inspired as of yet. I would like the case to have a vintage look.
 
Last edited:
12-27-11

Well, back to square one. While lightly wet sanding the grip, I only sanded for a few seconds and still managed to sand through the finish. So I had to dip it again. The problem is I cannot compromise on it. It is black and shows every little blemish in the finish. There are only two outcomes. There is no in-between with this finish.

I have all of the guides set and wrapped. I still have to do most of the tag work on the guides. It is close to being complete. I still need to buy some spar varnish and some pure turpentine. From what I have read it has to be artist grade turpentine. I have to dilute the spar. The turpentine can have no additives or it will not dry properly.
 
Last edited:
Tom,
I don't dip my wood in tung oil. I use minwax tung oil finish.
The reason you sanded thru the finish is tung oil is very soft and takes forever to dry.
I wipe on the minwax finish wait an hour and buff. I repeat this 3 or four times. you will get a nice hard glossy finish.
You can add more to gain an even higher gloss. I do not sand only buff. after that it's straight to the varnish. give it a coat wait 48 hours and hit it lightly with 0000 steel wool repeat 3 times. let dry 72 hours and buff with very fine3m auto body abrasive. then do final buff with the butchers wax. Should look like that baby grand by then. I'll try to post a pic for you to see an amboyna burl reelseat I just did.
Post some pics of those wraps you did I'm dying to see them.
Ron
 
I haven’t posted to my blog in a few days. I took a break over the holidays. I started to get a little burn out on the rod. I did some more wrap work on rod yesterday. I finished the butt section. Still need to wrap the tags on the tips. It is a lot of work. The small tag wraps are tough. They have come unraveled numerous times. I am getting close to finishing the thread work.
 
Last edited:
4-2-12
I haven’t been able to work on the rod for a while. My schedule has been crazy. I would have had only a few hours a week to work on the rod anyway I would not have gotten much accomplished. I worked all day on Saturday and part of the day on Sunday. I finally finished wrapping the thread. I think I made more bad redo wraps then good ones. I was getting a bit scared. My one spool of thread was getting thin. I was also able to apply the first coat of Spar on the thread. I cut the Spar by 66 percent & 33 percent with Mineral spirits did a test to see if it would dry. It worked fine. I used a thin artist paint brush to apply the thinned Spar. While spinning in the rod dryer. 1 more coat of thinned and 2 coats of full strength Spar and some butchers wax and the rod will be complete. I will probably start building the wooden case for the rod this week end. Will post picture after the Spar work is finished.
 
Last edited:
4-15-12

I spent most of the day Saturday assembling the wooden fly rod case. I am using Oak. Had a small set back on my rod. I had put the last and finish coat of spar on the thread. While I was outside gluing and clamping the case together, my wife decided to neaten up my fly tying / rod building section of the basement. Needless to say she moved my rod which was hanging and drying nicely and some how the rod was touched and marred the finish on the thread. Now I have to do more sanding.
 
Last edited:
Back
Top